
First, why learn Webpack?
The current difficulties of Web development are complicated file dependency, low efficiency of static resource request, unfriendly modularization support, and low compatibility of browser to advanced JS features
Webpack is a popular front-end project construction tool (packaging tool), which can solve the dilemma faced by the current Web development, and is the embodiment of engineering and automation ideas in the front-end development. Webpack provides friendly modularization support, as well as code compression and confusion, dealing with JS compatibility issues (need to combine with Babel), performance optimization and other powerful functions, so that programmers put the focus of work on specific function implementation, improve the development efficiency and maintainability of the project.
Second, environment building
- Create a blank directory for the project and run NPM init -y to initialize the package.json configuration file
- Run the NPM install webpack webpack-cli -d command to install webpack-related packages
- -d development dependencies, –save-dev, just to help you develop better, projects run without relying on files that are not deployed online
- -s Runs dependencies, short for –save
- For webPack 4+, webPack-CLI must be installed to connect corresponding services using the WebPack protocol
- NPX webpack -v check to see if the command is successfully installed NPX ($PATH = $node_modules/. Bin) Since NPX checks the environment variable $PATH, system commands can also be called.
3. Start WebPack to perform the build

1. Differences between Module Chunk bundles
- Module – each source file, all modules in Webpack
- Chunk – A code block can be a combination of multiple modules
- Bundle – The final output file
2. Default Settings
- Webpack supports JS modules and JSON modules by default
- Supports modules such as CommonJS Es Moudule and AMD
- Webpack4 supports zero configuration, but it is weak and requires additional extensions for slightly more complex scenarios
3. Perform the build
- Create a new SRC source directory
- Create new SRC -> index.js

- The first method: NPX webpack
- Second way: modify package.json
"scripts": {
 "test": "webpack"
}
Copy the code
npm run test
- After the build is successful, we’ll notice that there is an additional dist directory in the directory with main.js, this one
The file is an executable JavaScript file that contains the webpackBootstrap startup function.
Core concepts of Webpack
Webpack has a default configuration file, webpack.config.js, which we can modify to personalize
Webpack.config.js configuration infrastructure
module.exports = {
   entry: "./src/index.js".// Package the entry file
   output: "./dist".// Output structure
   mode: "production".// Package the environment
   module: {
     rules: [
       // Loader module processing
       {
         test: /\.css$/,
         use: "style-loader"}},plugins: [new HtmlWebpackPlugin()] // Plug-in configuration
};
Copy the code
1. entry
The entry indicates which file webPack starts packing as the entry point, analyzing and building the internal dependency diagram.
The values of entry can be strings, arrays, objects
1.1 the string
// single entry SPA, essentially a string
entry: {main: './src/index.js'} is equivalent toentry: "./src/index.js".Copy the code
1.2 an array
entry: ["./src/index.js"."./src/other.js"]
Copy the code- Webpack automatically generates another entry module, loads in each specified module in the array, and exports the last module.exports as the module.exports of the entry module.
1.3 object
// Multi-entry is an object
entry: {
        / / the default value
        // main: "./src/index.js",
        index: "./src/index.js".other: "./src/other.js"
   	}
Copy the code
Note: Only objects are multi-entry
2. output
Output indicates where the resource bundles output from WebPack go and how to name them.
output: {
   filename: "bundle.js".// The output file name
   path: path.resolve(__dirname, "dist")// Output file to disk directory, must be an absolute path
   },

// Multi-entry processing
output: {
   filename: "[name][chunkhash:8].js".// Use placeholders and do not repeat file names
   path: path.resolve(__dirname, "dist")// Output file to disk directory, must be an absolute path
}
Copy the code
2.1 a placeholder
- hash
- Each build generates a hash. With respect to the entire project, the hash changes whenever a project file changes
- chunkhash
- Based on the dependency resolution of different entries, the corresponding chunk is constructed and the corresponding hash is generated. As long as the contents of the module that consists of the entry remain unchanged, the corresponding hash remains unchanged
- contenthash
- Is related to the contents of a single file. If the content of the specified file changes, the hash changes
- name
- id
Understand webpack hash, Contenthash, chunkhash
3. mode
Mode instructs Webpack to use the configuration of the corresponding mode:
| describe | The characteristics of | |
|---|---|---|
| development | The value of process.env.node_env in DefinePlugin is set to development. Enable NamedChunksPlugin and NamedModulesPlugin. | An environment in which code debugging can run locally |
| production | The value of process.env.node_env in DefinePlugin is set to production. Enable FlagDependencyUsagePlugin FlagIncludedChunksPlugin, ModuleConcatenationPlugin NoEmitOnErrorsPlugin, OccurrenceOrderPlugin, SideEffectsFlagPlugin and TerserPlugin. | An environment that optimizes code to run online |
| none | Exit any default optimization options |
Development: is enabled to facilitate hot update processing and identify which modules have changed. Production: automatically enable code compression, tree-shaking, Vue React, remove modulated code (such as warning in the development environment), handle side effects, etc
4. loader
Loader allows Webpack to handle files that don’t know anything else (webpack only handles.js and.json itself)
Common loader
Style-loader CSs-loader less-loader sass-loader postCSs-loader Adds the browser prefix TS-loader// convert Ts to js
babel-loader// Convert ES6, 7 and other new JS feature syntax
file-loader // Process the static resource module
url-loader // An enhanced version of file-loader can also convert images to base64 format
eslint-loader
...
Copy the code
5. module
Modules, in Webpack everything is a module, a module corresponds to a file. Webpack recursively finds all dependent modules starting from the configured Entry.
When webpack processes unrecognized modules, it is necessary to configure the module in Webpack. When detecting the format of modules, what loader is used to process them.
5.1 Processing Styles
Note: Loader is executed from back to front
module.epxort = {
	module: {
            rules: [{test: /\.less$/.// Specify matching rules and regular expressions
                // Loader module converts module processing
                // Loader is executed from back to front
                // css-loader adds CSS module contents to JS module
                // CSS in js mode
                // style-loader creates a style tag in HTML to place the CSS content in this style tag
                    use: [
                        'style-loader'.'css-loader'.'less-loader'}]}}Copy the code
Styles are automatically prefixed:
Postcss-loader
npx install postcss-loader autoprefixer -D
Copy the code
Create the postcss.config.js, postcss-loader configuration file
// postcss.config.js
module.exports = {
    plugins: [
        require("autoprefixer") ({overrideBrowserslist: ["last 2 versions"."1%" >]]}});Copy the code
// webpack.config.js
{
test: /\.css$/,
use: ["style-loader"."css-loader"."postcss-loader"]}Copy the code5.2 Handle static resource files such as pictures and fonts
- File-loader: processes static resource modules
The principle is to move the resource module identified in the package entry to the output directory and return an address name
Scenario: when we need modules, just move the source code to the package directory, we can use file-loader to handle TXT, SVG, CSV, Excel, image resources, etc
yarn add file-loader -D
Copy the code
{
test: /\.(png|jpe? g|gif)$/.//use one loader can use objects, strings, two loaders need to use arrays
use: {
loader: "file-loader".// options Additional configuration, such as resource names
options: {
// placeholder [name] Name of the old resource module
// [ext] old resource module suffix
// name: "[name]_[hash].[ext]",
// The packing location
outputPath: "images/"}}}Copy the code{
test: /\.(eot|ttf|woff|woff2|svg)$/,
use: "file-loader"
}
Copy the code- Url-loader: enhanced version of file-loader, file-loader can do it, in addition, it can also convert pictures to Base64 format, suitable for small pictures base64 advantages and disadvantages
yarn add url-loader -D
Copy the code
{
test: /\.(png|jpe? g|gif)$/,
use: {
loader: "url-loader".options: {
name: "[name]_[hash].[ext]".outputPath: "images/".// Convert base64 to base64 if the value is less than 2048
limit: 2048 // unit byte 1024 = 1kb}}}Copy the code6. plugins
Plugins are plugins for the whole webpack packaging process. The packaging process of Webpack has hooks, plugins can do things for you when the Webpack has reached a certain stage, similar to the concept of the life cycle, which can be used to perform a wider range of tasks. Plug-ins range from packaging optimization and compression to redefining variables in the environment.
6.1 HtmlWebpackPlugin
Htmlwebpackplugin automatically generates an HTML file after packaging, and introduces the JS module generated by packaging into the HTML.
npm install -D html-webpack-plugin
Copy the code
Configuration:
Title: The title element used to generate the pagefilename: The output HTML file name, index.html by default, can also be directly configured with subdirectories.template: template file path, support loader, such as HTML! ./index.htmlinject: true | 'head' | 'body' | falseInject all resources into a specific template or templateContent if set totrueOr body, all javascript resources will be placed at the bottom of the body element,'head'Will be placed in the head element.favicon: Adds the specific Favicon path to the output HTML file.minify| : {}falsePass the HTML-minifier option to the Minify outputhash: true | falseIf fortrue, will add a unique Webpack to compile hash to all contained scripts and CSS files, useful for decaching.cache: true | falseIf fortrue, which is the default and will publish files only after they have been modified.showErrors: true | falseIf fortrueThis is the default, and error messages are written to the HTML pagechunks: allows you to add only certain blocks (for example, only unit test blocks)chunksSortMode: Allows control blocks to be sorted before being added to a page. Supported values:'none' | 'default' | {function} -default: 'auto'

excludeChunks: allows certain blocks to be skipped, (For example, skip blocks of unit tests)
Copy the code
Example:
const htmlWebpackPlugin = require("html-webpack-plugin");
module.exports = {
    plugins: [
        new htmlWebpackPlugin({
            title: "My App".filename: "app.html".template: "./src/index.html"}})]Copy the code
<! -- index.html template -->
<! DOCTYPEhtml>
<html lang="en">
<head>
<meta charset="UTF-8" />
<meta name="viewport" content="Width = devicewidth, initial - scale = 1.0" />
<meta http-equiv="X-UA-Compatible"
content="ie=edge" />
<! HtmlWebpackPlugin -->
<title><%= htmlWebpackPlugin.options.title %>
</title>
</head>
<body>
<div id="root"></div>
</body>
</html>
Copy the code6.2 the clean – webpack – the plugin
Help us remove any extra or useless code from the dist directory after packaging
npm install clean-webpack-plugin -D
Copy the code
const { CleanWebpackPlugin } = require("cleanwebpack-plugin");
module.epxorts = {
plugins: [
new CleanWebpackPlugin()
]
}
Copy the code6.3 the mini – CSS – extract – the plugin
Extract the CSS into a separate file. It creates a CSS file for each JS file that contains CSS. It supports on-demand loading of CSS and SourceMap.
yarn add mini-css-extract-plugin
Copy the code
const MiniCssExtractPlugin = require("mini-css-extract-plugin");
module.exports = {
module: {
rules: [{test: /\.css$/,
use: [MiniCssExtractPlugin.loader, "css-loader"]]}},plugins: [
new MiniCssExtractPlugin({
filename: "[name][contenthash:8].css"}})]Copy the codeFive, the Babel
1. Babel handles ES6
Babel is a JavaScript compiler that converts ES6 code into ES5 code, allowing us to use new JS features without worrying about compatibility issues during development. It can also be flexibly extended on demand through the plug-in mechanism.
During compilation, Babel reads the configuration from the.babelrc JSON file in the project root directory. No such file will read the configuration from options in the Loader.
npm i babel-loader @babel/core @babel/preset-env -D
Copy the code
1. Babel-loader is a communication bridge between webpack and Babel, and won’t turn es6 into es5. This work needs to use @babel/preset-env, which includes es, 6,7, preset, 2.@babel/preset-env. Babel reads the configuration from the.babelrc JSON file in the project root directory during compilation. No such file will read the configuration from options in the Loader.
{
   test: /\.js$/,
   exclude: /node_modules/,
   use: {
   	loader: "babel-loader".options: {
   		presets: ["@babel/preset-env"]}}}Copy the code
// .babelrc
{
"presets": [["babel/preset-env"]],"plugins": []}Copy the codeBy default, Babel only supports some basic feature conversion, such as let. Some NEW ES6 apis, such as Promise, which conform to ES5 syntactic specifications, have not been converted. At this time, we need to use @babel/polyfill to install the new features of ES. To make up for missing features in older browsers
2. babel-polyfill
- Polyfill is an early concept that is compatible with browser compatibility
- Regenerator (supports generator(generator function) syntax) and Core-js (other ES6 syntax)
- Babel-polyfill is a combination of both (deprecated by Babel 7.4) and is recommended to use core-JS and ReGenerator directly
The installation
npm install --save @babel/polyfill
Copy the code
Note: it is injected as a global variable. Windows.promise, which causes contamination of global objects
// Wrap the top of the entry file index.js
import "@babel/polyfill";
Copy the code
Load on demand, reduce redundancy packaging entry no “@babel/polyfill” in the header
// .babelrc
{
"presets": [["babel/preset-env",
{
"useBuiltIns": "usage"."corejs": 3}]],"plugins": []
}
Copy the code
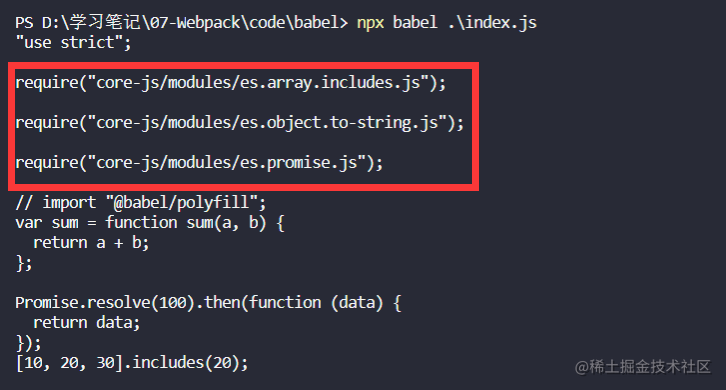
The useBuiltIns option is new to Babel 7. This option tells Babel how to configure @babel/ Polyfill
| role | |
|---|---|
| entry | Import “@babel/polyfill” once in the webpack entry file. Babel imports spacers based on how you use them, and unused functions are not imported. |
| usage | No import required, fully automated detection, but @babel/polyfill installed. |
| false | If you import “@babel/polyfill”, it will not exclude unused spacers and the program will be bulky. (Not recommended) |
3. babel-runtime
Change the compatibility API to a different name so as not to contaminate global variables
For example: Promise becomes _Promise

npm i @babel/runtime -S
npm i @babel/plugin-transform-runtime -D
Copy the code
// .babelrc
{
"presets": [["babel/preset-env"]],"plugins": [["@babel/plugin-transform-runtime",
{
"absoluteRuntime": false."corejs": 3."helpers": true."regenerator": true."useESModules": false}}]]Copy the code